Sunday, December 6, 2009

It's Been Awhile

Wow! I can't believe the last I am wrote on this blog was back in September! I guess I haven't been doing much with Blog Design lately!! Well, actually that's not true! I've now redone both this blog and my personal blog. They both needed a new look especially THIS one!! I still had my Spring theme up and it's almost Winter! I've also done a couple of blog makeovers for Brandi at Autumnfawn Lane and Rachelle at Rachelle's Writing Spot! Go and check them out and say hello!!

Another reason I haven't written is I haven't had any tutorials to write!! Well today I have one and it's SUPER easy!! Have you seen blogs that are snowing? If not pay close attention to this one and my personal blog too!! It's such a fun little embellishment that's not too overwhelming!! It's also perfect for the Christmas season!!

I am going to send you over to Blogger Buster because they have a great tutorial and all you have to do is click on the button that says: (make sure you're signed into blogger)

Add Snow Effect to your Blogger Blog

It will add the snow effect widget to your blog!! All you have to do is click save and viola you have SNOW!!!

I hope you're having a wonderful Holiday season!!

Friday, September 25, 2009

Want a Blog Makeover?

If you have been wanting a blog makeover but don't want to spend a lot of money on it here is your chance!! This past Summer I "met" Leah through the Button's for Lily fundraiser I had a few months ago! I created this button for her blog through this event.


I quickly became a follower of Leah's blog and am so excited about her journey of adoption. Leah and her hubby are raising money to help bring their baby home! Today, they are having a raffle on their blog to win a Blog Makeover by ME!! Head on over to their blog for the details! I hope one of my followers is the winner!! Good Luck!!

Monday, August 3, 2009

Post Signature

If you are wanting a cute signature for the bottom of your posts here's a quick and easy tutorial on how to add one to your blog!
  • You will need an image that has your signature. I use Photoshop to create mine. I know there are other programs, such as Microsoft paint. You'll want the image to be about 100x50 pixels. The size can vary it's really up to you and what you want. You can also add a cute image like I did here!
  • Next you'll need to up load the image to the internet. You can do this by using Photobucket, Flickr, Picasa or you can do as I did, and put it in a post right here on blogger! You will need to copy the URL address of the image and paste it into the code below.
  • Now you will need to copy the following code:
<img src="INSERT IMAGE URL ADDRESS HERE"/style='border: none; background: transparent;'>
  • Now you will need to go into your layout page and click on Settings.

  • Once in Settings click on Formatting:
  • Scroll down to Post Template and paste the code from above in the box and click the Save Setting button.
(To enlarge images click on the pictures)

  • Enjoy your new post signature!
FYI: Your signature will not appear on previous posts. It will only appear on posts from this point on. There is away to add your signature to all your posts, however it's not quite as simple as this! If there's enough interest on how to permanently add a signature to all your posts I'll write up a tutorial on how to do so in the near future!


Saturday, July 18, 2009

I recently mentioned in a previous post, on my personal blog, I've been reading the blog An Ordinary Miracle. This is an incredible family that has been through a lot these past few years with trying to complete their family! They have a sweet boy named Owen, who they adopted from Russia a couple of years ago. They are now in the process of adopting a little girl from South Korea who they've named Lily Soo!! They are raising money in order to bring Lily Soo home! They hope to be able to have her home by her first birthday in November!

For a couple of months now I've really felt the Lord calling me to use my hobby of Blog design for His glory! I have never charged for any of the blog design or blog services I have done thus far! I would however like to help this family bring Lily home so I thought I would do a Buttons for Lily Soo Sale!!

If you are interested in getting a button for your blog, NOW is a great opportunity to get one!! It can be a button and grab box for your personal blog or it can be for some special event happening on your blog too! Each button will only be $5! You can get a button and scrolling box to grab the code underneath for only 5 dollars!!

If you would like to purchase a button please email me at jenieshell at gmail dot com and pay the $5 fee by clicking on my paypal donate button at the bottom of this post. This sale will be for this week only and 100% raised will be donated to Bring Lily Home Fund!! I will transfer the total amount raised next Sunday, July 25th.

If you are not in need of a blog button but would still like to help out this great family please feel free to donate through my paypal button! I will make sure to include it in the final amount raised next week!

So now is the time to get your button and help bring Lily HOME!!!


Wow! It's been a month since I last posted!!

I realized this morning it's been exactly ONE month since I last posted!! Thank you so much for all the well wishes and prayers!! I am feeling better but still dealing with headaches. I am grateful to feel more like myself these days!! I feel the need to write a tutorial since it's been awhile since I posted one! So let me know what blogging question you are wanting answered and if I can answer it I'll try to write a tutorial on it!!

Thursday, June 18, 2009

Under the Weather

Hi all! I am writing to let my wonderful readers and fellow blog buddies know these past few weeks I've been under the weather and I've not been able to keep up with all the emails and comments I have received on this blog. I have recently received several emails and comments on how to tweak blogs but I just don't have the energy to respond to each of your questions right now. I apologize for not being able to help you with your specific blogging needs . Please know I read all your comments and emails. I would ask you to refer to my tutorial section as I have lots of tips and hints there. Hopefully I'll be back to feeling like my normal self and can help with your blogging questions soon! I wish you the best of luck and please send me links to your blogs so I can see what you are doing and the success you have made!!


Happy blog tweaking to all and thanks for understanding!!

Saturday, June 6, 2009

Navigation Bar Images

This tutorial is to be use AFTER you know how to create a navigation bar! If you don't know how to create a Navigation bar please click here!


Ok, now that you know how to create a Navigation Bar let me explain how to add images* to your navigation bar instead just using text, similar to the one above! Each navigation link such as About me, Blog Roll etc were each different images. So for the above navigation bar I had to create four different images, one for each link!

Remember the HTML code you added in a widget under your header? That's what you are going to tweak in order to have an image for your link instead just text. Your current code in your widget should look something like this:

&lt;div id="newnavbar"> &lt;ul> &lt;li>&lt;a href="http://all-about-me.html">All About Me&lt;/a>&lt;/li> &lt;li>&lt;a href="http://blogroll-html">Blog Roll&lt;/a>&lt;/li> &lt;li>&lt;a href="http://giveaway-html">Giveaways&lt;/a>&lt;/li>&lt;li>&lt;a href="http://contact-me.html"\>Contact&lt;/a>&lt;/li> &lt;/ul>&lt;/div>

Now you are going to replace the WORDS that appear on your navigation bar (YELLOW words)with this code.

<img src="URL address of your uploaded image"/>

After you have replaced all the Words such as All About Me etc with your new code including the url address of your images then click save and enjoy your new customized navigation bar!

On a side note, the padding and margins may need to be adjusted in order to fit the new images!


*You will need to upload your images to the Internet. You can use flicker, photobucket, picasa or simply upload them in a post on Blogger!! There you will be able to get the URL address for the image! That address is what you paste into red html code above!


I hope this was easy to follow! Any and all feedback is always appreciated!

Sunday, May 17, 2009

How to Make a Navigation Bar for Blogger Blogs

I recently received several emails asking how to install a navigation bar. I thought the easiest way to help my blogging buddies would be to try to write a tutorial! I say the word try because honestly it's a little tricky and I am still figuring out the kinks!! In fact recently, while changing the look of my personal blog, I kept getting stuck while installing the navigation bar. It kept putting my links and a box and I couldn't figure out how to get rid of that BOX!!! Thankfully after taking a break I finally figured it out!! Hopefully after all my frustrations, it's still fresh in my mind and I can write this tutorial !


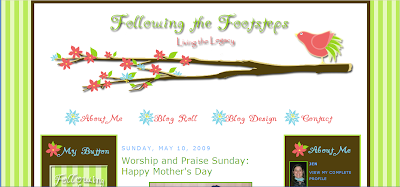
This is a picture of my personal blog! Isn't it pretty? You can see my navigation bar directly below the tree branch! This is an example of a navigation bar where I used images for my links! In order to make this tutorial as simple as possible I am going to start by showing you how to create a navigation bar just using text. Similar to the one on this blog!

Ok, let's get started and install that navigation bar!! (Hope I haven't scared you off! Honestly it's not too hard!!)

  • Go into your layout page and click on edit HTML.
It's always a good idea to download a copy of your template before changing your HTML.
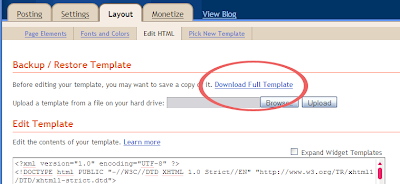


I also recommen
d clicking on preview before saving your newly edited template!!!!


You will need to look for the html code that needs to be edited. Click on the link below to see what needs to be changed.

Now go ahead and click save! It's ok to click save THIS TIME because there isn't anything to preview!!

What you just did was make it possible to add a widget to your header!! This is where the navigation bar will go!! If you go back to your layout page this is what it should NOW look like!


  • Now that we are able to add a widget to our header lets go ahead and add the code for the links of the navigation bar in a new widget. Click Add a Widget and select HTML/Javascript. In the text box you will copy and paste the html code for the navigation bar.


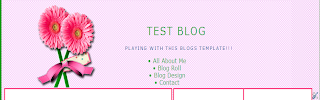
Once you have added and personalized this code go ahead and click save! This is what you will see!!


Don't worry are not done yet!!

Are you still with me?


Let me clear up a couple of things before we move on:


First if you want your navigation bar to be centered in the middle of your page you will need to add the code below in red, to the html code you just saved in your header widget:


<center> in front of your code.

and

</center> at the end of the code.


If your links are appearing above your header and you want them below the header then

simply go into your layout page and drag the widget below your header and drop it! Just like you do when you are arranging your widgets on your sidebars.


  • Now we need to edit your html code in order to get the links to appear in a line on your page instead of a list!!

Align Left

  • Go into your layout page and click on Edit html. Once again if you haven't done so download a copy of your template and her e's where the preview button , I mentioned earlier, will come in handy!!
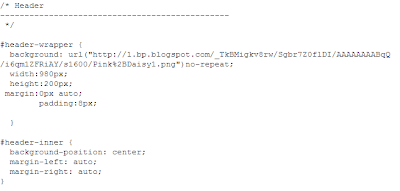
  • Look for the Header section of the CSS code. It should look something like this:

Click here for the code that needs to be added and further instructions.
  • Now click Preview and if you are happy with what you see then click save!

It's should look something like this!


Soon I will write a tutorial on how to add an image to your navigation bar! I hope this tutorial was helpful I would LOVE any and all feedback! I hope it's easy to follow! Please don't hesitate to contact me if anything I mentioned in this tutorial was unclear! All I ask is that you be specific in your questions so I can better help you!

Friday, April 10, 2009

Scrolling Blog Buttons

Update: There are several comments below about problems with only the first 3 buttons scrolling and it starting over!! Well, I too ran into that problem when working on a blog makeover. Honestly I am not sure exactly what was causing the problem. I had to remove the widget and reinstall the code. It seemed to work! I am sorry I don't have a technical answer, I'd just say if you still running into this problem. Remove the widget and start again! If I figure out why it's doing this I'll let you know!!

-----------Original Post----------------

I recently learned how to create a widget where all my favorite blog buttons can scroll through a smaller space on my sidebar therefore making it look less cluttered!

They scroll like this:


Here's a how YOU can make your blog buttons SCROLL too!!

1. Go into your layout page and click on Add a New Gadget

2. Choose HTML/Javascript

3. Add the following code in the text box:

<center><div class="textwidget"><marquee direction="up" width="200" onmouseover="this.stop()" scrollamount="5" onmouseout="this.start()" height="400" align="center"> THIS IS WHERE YOU ADD THE HTML CODES FOR YOUR FAVORITE BUTTONS! (You can add as many as you like!) </marquee></div>

The colors in red can be adjusted to fit the space on your sidebars.

The number 5 in yellow adjusts the speed of how quickly the buttons will scroll! The higher the number the faster they will GO!

4. Click save and Viola!!

Enjoy your scrolling buttons and a lot less clutter on your blog!

Sunday, April 5, 2009

JDC goes Springy!!


As I mentioned last week I've been working on a new look for this site!! It's Springy and I am happy with the end result!! I really like the cute little caterpillar!! Isn't he cute!! I have to give a shout out to Andrea! She's the one that create this amazing kit called Think Spring!! As soon as I saw it I knew I'd have to play with it!!

I did however create the blue stripped background and the pink bird on my own! Maybe one day I'll be as good of a graphic designer as Andrea!! (I highly doubt it, but a girl can dream right?)

Sunday, March 29, 2009

New Blog Button


I have a new blog button for this site!! If I have worked on your blog and you would like to change out the old button then please feel free to grab the code!! If you just want to put my button on your blog, even if I haven't worked on your blog, by all means GO AHEAD!!

This new button is s glimpse of what I've been working on for this site! Stay tuned!! It's cute and springy and it's a completely new way to code the template so I am excited!!

Tuesday, March 10, 2009

Blog Makeover Giveaway!

Wanna win a FREE blog makeover? If so head over to my personal blog, Following the Footsteps, for a Free Blog Makeover Giveaway!! It's Part of SITS Spring Fling!!


Contest ends March 10th at Midnight!

Saturday, February 7, 2009

Freebie (Butterflies)

Once again today I've been playing with blog templates!! I just love being challenged to learn something new!! I had to completely re-do this one to make it look right but I am really happy with the end product! Again I really hope someone out there in can enjoy this template!! If you grab the code please leave me a comment and put my blog button on your blog!! That's ALL you have to do!! Enjoy!


Friday, February 6, 2009

More Freebies! (Knitted Flowers)

I've been playing on my photoshop today, so here are some more freebies!

Another Freebie!! Rounded Corners

I've been working on this one for awhile! I am all about learning how to do new things! I learned how to make rounded corners! It was not easy and I still have somethings to learn but at least I got this one to look decent. I hope someone out there can use it for their blog!! If you grab the code don't forget to leave me a comment so I can stop by and say hello!!

Jen


Saturday, January 24, 2009

Adding a Blog Button to your Blog

Have you noticed blog buttons popping up all over the blogosphere? They are the new cool thing to have on blogs!! It seems like everyone has a grab code box on their blogs!! Once you've grab the code how do you get it on your blog? Here's a tutorial on how to add that special blog button to your blog!

First, of course, you need to highlight and copy and the code inside the scroll box.

Now go to your layout page and click Add a Gadget.


The Add a Gadget Page will now pop up!


Scroll down and click on HTML/JavaScript.


Once the HTML/JavaScript box pops up paste the code in the box.
(the one you grabbed from the scroll box)

Last click save and enjoy!!

You can then go back into your layout page and move the blog button where you want it on your sidebar by dragging and dropping it!! Don't forget to click save at the top of your layout page!!

Amy this was for you!! Hope it was helpful!!

Saturday, January 17, 2009

Amazing Graphic Designers

I've been fortunate to get permission from some fabulous graphic kit designers!! I've dabbled a little in graphic designs and I am here to tell you it's NOT easy, so these ladies have my up most respect!! I wanted to give them a shout out here! So if you're in to digi-scrapping go and check them out!! Several of them design for free and the kits for sale are always reasonable!! So go now and check them out!!!


Sunday, January 11, 2009

Love Birds-Freebie

Download
(To download all you have to do is copy and paste the code!)

Just in time for Valentines Day!! I have a new freebie for you!! It's called Love Birds!! Andrea at Here a Scrap There a Scrap has graciously given me permission to use her My Love kit for this Freebie! All I ask is for you to leave me a comment letting me know you snagged the template code and don't forget to display my Blog Button on your blog once you have the template installed!! (Easy step by step instruction on how to install your new template are included in the download!)

Enjoy!!

Saturday, January 10, 2009

How to change the favicon on your Blogger Blog

My good friend, Anne, asked if I could write a tutorial on how to change the favicon on a Blogger Blog! If you're wondering what a favicon is, let me explain! It's the graphic next the url address in address box! You know this......

Click picture for better viewing.


It's actually quite easy to change the blogger image to one that is unique and fits your blog. Here's a step by step tutorial on how to do it!

1. You need an image that ranges from 16 x 16 to 32 x 32 pixels in size. You can create this on Photoshop and then resize the image. When saving it to your hard drive save it as PNG file.

2. Once you have an image, upload it to the internet. You can use Photobucket, Flickr or you can even publish it in a post on your blogger blog!! (You'll need to get the url address once it's been uploaded.)

3. Now you are ready to change the favicon. You will need go into your layout page and click on Edit HTML. Scroll down just a bit (It's pretty close to top) and look for this code:

<title><data:blog.pagetitle/></title>

Once you locate the code you will REPLACE it with this code:

<link href='URL of your image' rel='shortcut icon' type='image/vnd.microsoft.icon'/>

(You will need to add the URL address for your image inside this code where is says, URL of your image, in black)

4. Now you are ready to PREVIEW your page, to see if the favicon has been changed! If it is has successfully changed go ahead and click on save!

Enjoy!!

Saturday, January 3, 2009

How to add authors to your Blogger blog.

Did you know more than one person can be an author on a blog? My sister and I recently started a blog together and I realized it's pretty easy to have more than one author! Here's a tutorial on how to add an author to your blog.

1. Log into your blogger account.

2. Click on the layout or customize.

3. Next click on the Settings Tab.

*Click on images for a better view


4. Once in Settings, click on Permissions.


5. There you will be able to add an author by entering a gmail address. (The other person MUST have a google account.)


6. Now the new author must accept the invitation to be an author by logging into their gmail account.

Now there will be more than one contributor to your blog!!

Granting Administrator Privileges:
(This allows the new author to edit or change the template code)

If you need or want to grant your new author administrative privileges simply go back to the Permission section, after new author has accepted invitation, and click on "grant admin privileges."


And if for what ever reason an author needs to be removed all you have to do is click "remove" under the Permission Section.

Hope this tutorial has been helpful!

Thursday, January 1, 2009

New JDC Header