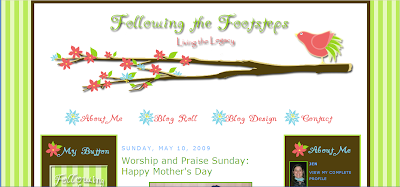
This is a picture of my personal blog! Isn't it pretty? You can see my navigation bar directly below the tree branch! This is an example of a navigation bar where I used images for my links! In order to make this tutorial as simple as possible I am going to start by showing you how to create a navigation bar just using text. Similar to the one on this blog!
Ok, let's get started and install that navigation bar!! (Hope I haven't scared you off! Honestly it's not too hard!!)
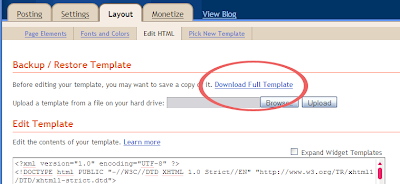
- Go into your layout page and click on edit HTML.

I also recommend clicking on preview before saving your newly edited template!!!!

You will need to look for the html code that needs to be edited. Click on the link below to see what needs to be changed.
Now go ahead and click save! It's ok to click save THIS TIME because there isn't anything to preview!!
What you just did was make it possible to add a widget to your header!! This is where the navigation bar will go!! If you go back to your layout page this is what it should NOW look like!
- Now that we are able to add a widget to our header lets go ahead and add the code for the links of the navigation bar in a new widget. Click Add a Widget and select HTML/Javascript. In the text box you will copy and paste the html code for the navigation bar.
Once you have added and personalized this code go ahead and click save! This is what you will see!!
Don't worry are not done yet!!
Are you still with me?
Let me clear up a couple of things before we move on:
First if you want your navigation bar to be centered in the middle of your page you will need to add the code below in red, to the html code you just saved in your header widget:
<center> in front of your code.
and
</center> at the end of the code.
If your links are appearing above your header and you want them below the header then
simply go into your layout page and drag the widget below your header and drop it! Just like you do when you are arranging your widgets on your sidebars.
- Now we need to edit your html code in order to get the links to appear in a line on your page instead of a list!!

- Go into your layout page and click on Edit html. Once again if you haven't done so download a copy of your template and her e's where the preview button , I mentioned earlier, will come in handy!!
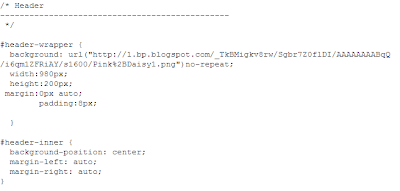
- Look for the Header section of the CSS code. It should look something like this:
Click here for the code that needs to be added and further instructions.
- Now click Preview and if you are happy with what you see then click save!
Soon I will write a tutorial on how to add an image to your navigation bar! I hope this tutorial was helpful I would LOVE any and all feedback! I hope it's easy to follow! Please don't hesitate to contact me if anything I mentioned in this tutorial was unclear! All I ask is that you be specific in your questions so I can better help you!


74 comments:
OH MY GOSH!
I am SOOOOOO excited that you posted about this because I was trying to work up the courage to ask you about it!
I just glanced over it - since I'm at work and can't mess around with mine right now - but I will delve into it later this week.
Jen - you are SUCH an inspiration and I really apprecaite you sharing your knowledge!
I seriously <3 you right now!!! :D
Thank you so much for doing this tutorial!
When I'm a little more lucid, I will attempt the process but in the mean time, I favorited this post!
I'd love to learn how to do this navigation bar with images!! Thanks. This was a great tutorial!
WOHOO!!! I did it!! Thak you SO much! You are the "Blog Goddess!"
I wish I could figure out how to move it down some, but other than that, WAHOO!
~Michele from By Your Side
Come see:http://michele-byyourside.blogspot.com/
thank you so much! I am going to try this out!
Thank you so much! I just did this on my blog. However, I am finding that the left margin is still wider than the right. How do I fix this?
Also, how can I remove the border or make it transparent? Thanks so much for your help!
I figured out the border part on my own. Thanks, though.
Got the margin too, just typed float: $startSide;
By the way, has anyone told you lately how awesome you are at this! Keep up the great work.
Okay, I have a stupid question...when you click on a title of your nav bar (like Blog Roll), what does that link to? Is it a separate post that we never saw? I mean, where do we format THAT stuff?
I'm with the same person as above. I got the bar coded, and in, but now how do I get the button to link to different pages? When I click on them, they just go to Address Not Found.
ok, im on a mission today to try this out. thank you for the tutorial.
I worked on this all day and got the buttons in the navigation bar up and working. I ran into a problem when I added a 5th button. It made the space under the buttons bigger. I have been playing around with the padding and it never seems to get smaller. HELP!
Very good job. I love the google document...great idea! I never knew how to make the tabs INSIDE THE HTML. I created nav tabs without going into HTML, if you want to check them out on my blog.
Here’s to more happy scrapping, and
Hugs from the heart,
Jeanette
Come scrap your blog with me…
Easy Custom Blogs
-:¦:-.•:*¨¨*:•.-:¦:-.•:*¨¨*:•.-:¦:-.•:*¨¨*:•.-:¦:-.•:*¨¨*:•.
Thank you! Your tutorials are easy to follow. My blog is 'under construction'. So as I understand more, hopefully it will be as pretty as yours. Thanks you again. www.thefamilyoftubbs.blogspot.com
Thx for this awesome post. It helped me a lot with my blog.
And it was so easy to understand.
This blog is a very great help!
:)
You are awesome. I am so excited I came across your blog. Just yesterday I asked another blogger how she did this. You made my day. The blog I am doing this for isn't really functiong yet...however you have helped me get more of the look I want. BIG THANKS
Thank you so much for your tutorials. They are very "user friendly". Easy to understand without searching all over the internet.
I would really like to know how to put buttons on the header. I mean, like having "about" and "contact" ON the ACTUAL header.. could you do a tutorial on that?
thanks :)
hello..thanks a lot for the tutorial.its really helps me to solve my prob..
cheers
Thanks for this tutorial, it was so easy to follow and I am loving the way my blog looks now.
Thank you for posting this :D Awesome!!!!
found your site while {googling} and all i can say is you've been a HUGE lifesaver!
easy to follow!
thank you so much!
Thanks so much for giving such a good tutorials here. It was really helpful.
Thanks so much. After stressing and not being able to figure this out your was very simple. They only thing I was wondering and hopefully you could answer is how can you change the color. If at all possible.
THANK YOU! Very helpful!!!
Hi, I'm so glad I found you! BUT... Please teach me how to add a separate url for the buttons on the nav bar. I spent ALL day trying to figure that out--to no avail. How do I make pages to go to for each thing: "about me" "contact" etc...
Thanks!
Herself just asked the very same question that I have. I emailed you about it Jen. Thanks so much for this tut, I've wanted to do this for a long time and had no clue how to do it.
Thanks so much this post was VERY helpful. I used another code that was easier but the quality & look of this nav bar is way better!
Fashionablyfly.blogspot.com
I googled Nav Bar and found your easy tutorial. Thanks so much! I'm headed over to your home page to follow you.
I have used your tutorial for several of my blogs and I am trying to do it again on a different template. I got all the first part done fine but I can't get them to go across the page instead of lined up in the middle. Do you have any hints for me. This is where I put it in the HTML
#header .widget, #main .widget {
margin-bottom:12px;
padding-bottom:12px;
}
#newnavbar ul li{
font-size: 180%;
font-family: verdana;
display:inline;
padding: 20px;
margin: 20px;
margin-right: -15px;
}
#newnavbar li a{
color:#2cae1f;
}
#newnavbar li a:visited {
color: #cb2a2f;
}
#newnavbar li a:hover {
background: #b2c74f;
}
#header {
background:url("http://www.blogblog.com/scribe/divider.gif") no-repeat bottom $startSide;
}
thank you so much for a great tutorial!
wow!!! I am always looking for great tutorials to recommend for peolpe and this one is GREAT!!!
This is THE best tutorial for this I've seen! Thanks for sharing!!!
I bow down to you. Thank you so much for this. I can't tell you how many other "help" sites I've gone to only to be told my template wasn't compatible. Thank you again!!
I can't get past the first time I'm supposed to play with the html, because I can't find the stuff I need to edit in my blog html.
Suggestions? Please?
I even used the search thingy on my browser. It seems like I just don't have the hmtl that's supposed to be edited.
ps. The other day I decided to convince some of my followers to make blog buttons of their own if they haven't already, and I shared some links to your blog to help them figure out how to do so.
thanks for the help...a few quick questions though...
How do I change the font from Italic to just regular bold? Also, how do I make it so the nav bar stays centered? I put the center code around it but its still sort of off...any help would be great...
I tried doing the image version too, didn't work for me either
You are a Godsend!Thank you thank you thank you. I've been to your site for a quite a few things now- you make it so easy and clear!
thank you again!
Lil
Hey there,
Just this quick note your way...thanks so much for your easy to follow instructions!
It was a great help!
Someone else, I'm not quite sure who...posted something about putting a picture in your header...and remove the double lines around it...increasing the size of the border...thank you again...
Phoenix...
Thank you so much! I had searched forever to find a tutorial like this. All the others I found were unclear, and even though I tried them hundreds of times, they never worked! :)
Hi jen! (:
I'm really grateful that u wrote about this tutorial thing..(:
I learned a lot! & i mean, xo much!
Thank u very2x much!
Muahhh..(:
N.A.J.N.E.E.
Love your tut's but having issues with my nav bar going across the blog instead of a list. It looks like I have two lists now, not sure what to do. Please help. my blog is http://positivelyperfectparty.blogspot.com
you can email me at positivelyperfectparty@gmail.com
Hi! Thanks so so much!!! You are so amazing!! Thanks for sharing!! Love your blog esp your tutorials, bookmarked already :)
www.momthatblogs.blogspot.com
..i thank you for this tutorial...it helped me a lot....
Thank you SOOOOO much! This is perfect and awesome! You are awesome! Muah muah muah!
Thank you so much for your tutorial and I plan on putting your button on our blog....
I need a little help because I am not computer savy at all. When entering the code for the navigation bar, in red you say to put your url address specific to your blog what do you mean?....this might be such a dumb question but I don't care lol! Next time I will have you design my blog and save my headache! Thanks!
Thanks! You rock!!! Easy as pie. I wish I would of found you sooner ;)
Thank you! This is much easier than I thought it would be! Now I just need to get the pages ready to input into the code.
Thank you SO much!!
I used your skills to make a blog button and now a Nav bar!
Thank you!
hey there, thanks for that tutorials
THANK YOU! THANK YOU! THANK YOU! I've been needing a tutorial like this for a LONG time! Super easy and just what I wanted! I'm now off to see your tutorial on how to add an image to my new nav bar!
it worked like a charm ....
thanks from bottom of my heart.
god bless you
I'm reeeeeeealy happy for this post. I've been looking for ways to spruce up my blog abit..Hopefully this post should help me make some serious cash with my blog....THANX A MILLION
http://www.ittreasure.com/2010/01/how-to-make-navigation-bar-for-blogger_27.html
I believe someone lifted your tutorial :(
SOOOOOOOO HELPFUL!!!
Thank you!
Thank you so much for this wonderful tutorial. I was able to make my navigation bar and it looks very nice! Your instructions were easy to follow -- I can't beleive how much better my blog looks now. You have a new follower
Laurie
http://lauriethoughts-reviews.blogsot.com
Thanks so much! I found you on a google search, and I'm so glad you posted this stuff! You have such cute designs!
The only problem Im having is this, How can I make the background to my links a color like yours ?
And when I pick a color to change the navigation words to the color never changed.
What do I do ?
I'm getting Internet Explorer cannot dispaly webpage for each of my links:(
Hi there!!!
Very helpfull post... although I am dying for some extra help. I would like to center my horizontal navigation bar... I tried putting the "center" codes you gave in the HTML I have put in my header... but my navbar is still desperatly stuck on the left!!!
If you have a spare minute to have a wee look at my blog maybe something will be obvious to you more than it is to me ;-)))
THK U
You rock this what so easy! What a blessing. Thanks!
thank you sooo much! ^^
Its so impressive and easy to do thanks for sharing.
Thank you so much! Your tutorial was very easy to follow! You rock!
this didnt work for me. the code wasnt even there?
Seriously you've made my day. of the 50 pages ive read and the 10 i maybe comprehended this was the only code that actually showed up and its perfect.i even changed the verdana text which was in red.thank you so much you're my hero
Thank you so much. Just have one question how do I remove that line at the end?
I happened upon your site by googling my question and am so glad I did! Majorly easy tutorial to follow. Thank you so much!
Thank you very much for this! ;D
Thank you SO MUCH for this! I've been scouring the internet for hours trying to figure this out on other sites. You explained so simply! Much appreciated. :-)
A little late, but just wanted to say thanks, this was the easiest tutorial I have seen. and . it worked!.
Hi sweetie i tried to follow what you did and it only let a few of them go bigger, i went back over it and there is still one small one, also is there a way like this blog is where if you go on the nav tabs people could leave a comment, if that makes sense pops x
Hi Jen! Thanks so much for this tutorial! It's exactly what I've been looking for! (:
Just one question - How do you change the font? I want to use "Sunshiney" but when I put that in instead of Verdana, there's no effect :(
Thanks so much, Jen!
THANK YOU Jen !!
it's helpful, so now I have a navigation bar for my blog, haha
Bless you Jenieshell! I have searched and searched on how to make a menu for my blog and now you have made it so easy for me to understand and I did it!! Thanks so very much :)
I am now a loyal follower xx
Huggs
Lynn xxx
Post a Comment