


Happy blog tweaking to all and thanks for understanding!!
Thursday, June 18, 2009
Under the Weather
Hi all! I am writing to let my wonderful readers and fellow blog buddies know these past few weeks I've been under the weather and I've not been able to keep up with all the emails and comments I have received on this blog. I have recently received several emails and comments on how to tweak blogs but I just don't have the energy to respond to each of your questions right now. I apologize for not being able to help you with your specific blogging needs . Please know I read all your comments and emails. I would ask you to refer to my tutorial section as I have lots of tips and hints there. Hopefully I'll be back to feeling like my normal self and can help with your blogging questions soon! I wish you the best of luck and please send me links to your blogs so I can see what you are doing and the success you have made!!


Saturday, June 6, 2009
Navigation Bar Images
This tutorial is to be use AFTER you know how to create a navigation bar! If you don't know how to create a Navigation bar please click here!
 Ok, now that you know how to create a Navigation Bar let me explain how to add images* to your navigation bar instead just using text, similar to the one above! Each navigation link such as About me, Blog Roll etc were each different images. So for the above navigation bar I had to create four different images, one for each link!
Remember the HTML code you added in a widget under your header? That's what you are going to tweak in order to have an image for your link instead just text. Your current code in your widget should look something like this:
 Ok, now that you know how to create a Navigation Bar let me explain how to add images* to your navigation bar instead just using text, similar to the one above! Each navigation link such as About me, Blog Roll etc were each different images. So for the above navigation bar I had to create four different images, one for each link!
Remember the HTML code you added in a widget under your header? That's what you are going to tweak in order to have an image for your link instead just text. Your current code in your widget should look something like this:
<div id="newnavbar"> <ul> <li><a href="http://all-about-me.html">All About Me</a></li> <li><a href="http://blogroll-html">Blog Roll</a></li> <li><a href="http://giveaway-html">Giveaways</a></li><li><a href="http://contact-me.html"\>Contact</a></li> </ul></div>
Now you are going to replace the WORDS that appear on your navigation bar (YELLOW words)with this code.
<img src="URL address of your uploaded image"/>
After you have replaced all the Words such as All About Me etc with your new code including the url address of your images then click save and enjoy your new customized navigation bar!
On a side note, the padding and margins may need to be adjusted in order to fit the new images!
*You will need to upload your images to the Internet. You can use flicker, photobucket, picasa or simply upload them in a post on Blogger!! There you will be able to get the URL address for the image! That address is what you paste into red html code above!
I hope this was easy to follow! Any and all feedback is always appreciated!
Sunday, May 17, 2009
How to Make a Navigation Bar for Blogger Blogs
I recently received several emails asking how to install a navigation bar. I thought the easiest way to help my blogging buddies would be to try to write a tutorial! I say the word try because honestly it's a little tricky and I am still figuring out the kinks!! In fact recently, while changing the look of my personal blog, I kept getting stuck while installing the navigation bar. It kept putting my links and a box and I couldn't figure out how to get rid of that BOX!!! Thankfully after taking a break I finally figured it out!! Hopefully after all my frustrations, it's still fresh in my mind and I can write this tutorial !
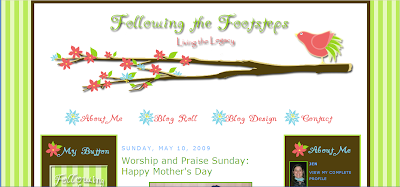
This is a picture of my personal blog! Isn't it pretty? You can see my navigation bar directly below the tree branch! This is an example of a navigation bar where I used images for my links! In order to make this tutorial as simple as possible I am going to start by showing you how to create a navigation bar just using text. Similar to the one on this blog!
Ok, let's get started and install that navigation bar!! (Hope I haven't scared you off! Honestly it's not too hard!!)
I also recommend clicking on preview before saving your newly edited template!!!!

You will need to look for the html code that needs to be edited. Click on the link below to see what needs to be changed.
Now go ahead and click save! It's ok to click save THIS TIME because there isn't anything to preview!!
What you just did was make it possible to add a widget to your header!! This is where the navigation bar will go!! If you go back to your layout page this is what it should NOW look like!

Soon I will write a tutorial on how to add an image to your navigation bar! I hope this tutorial was helpful I would LOVE any and all feedback! I hope it's easy to follow! Please don't hesitate to contact me if anything I mentioned in this tutorial was unclear! All I ask is that you be specific in your questions so I can better help you!

This is a picture of my personal blog! Isn't it pretty? You can see my navigation bar directly below the tree branch! This is an example of a navigation bar where I used images for my links! In order to make this tutorial as simple as possible I am going to start by showing you how to create a navigation bar just using text. Similar to the one on this blog!
Ok, let's get started and install that navigation bar!! (Hope I haven't scared you off! Honestly it's not too hard!!)
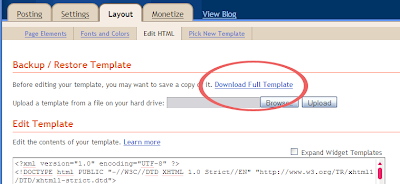
- Go into your layout page and click on edit HTML.
It's always a good idea to download a copy of your template before changing your HTML.

I also recommend clicking on preview before saving your newly edited template!!!!

You will need to look for the html code that needs to be edited. Click on the link below to see what needs to be changed.
Now go ahead and click save! It's ok to click save THIS TIME because there isn't anything to preview!!
What you just did was make it possible to add a widget to your header!! This is where the navigation bar will go!! If you go back to your layout page this is what it should NOW look like!

- Now that we are able to add a widget to our header lets go ahead and add the code for the links of the navigation bar in a new widget. Click Add a Widget and select HTML/Javascript. In the text box you will copy and paste the html code for the navigation bar.
Once you have added and personalized this code go ahead and click save! This is what you will see!!

Don't worry are not done yet!!
Are you still with me?
Let me clear up a couple of things before we move on:
First if you want your navigation bar to be centered in the middle of your page you will need to add the code below in red, to the html code you just saved in your header widget:
<center> in front of your code.
and
</center> at the end of the code.
If your links are appearing above your header and you want them below the header then
simply go into your layout page and drag the widget below your header and drop it! Just like you do when you are arranging your widgets on your sidebars.
- Now we need to edit your html code in order to get the links to appear in a line on your page instead of a list!!

- Go into your layout page and click on Edit html. Once again if you haven't done so download a copy of your template and her e's where the preview button , I mentioned earlier, will come in handy!!
- Look for the Header section of the CSS code. It should look something like this:

- Now click Preview and if you are happy with what you see then click save!
It's should look something like this!

Soon I will write a tutorial on how to add an image to your navigation bar! I hope this tutorial was helpful I would LOVE any and all feedback! I hope it's easy to follow! Please don't hesitate to contact me if anything I mentioned in this tutorial was unclear! All I ask is that you be specific in your questions so I can better help you!
Friday, April 10, 2009
Scrolling Blog Buttons
Update: There are several comments below about problems with only the first 3 buttons scrolling and it starting over!! Well, I too ran into that problem when working on a blog makeover. Honestly I am not sure exactly what was causing the problem. I had to remove the widget and reinstall the code. It seemed to work! I am sorry I don't have a technical answer, I'd just say if you still running into this problem. Remove the widget and start again! If I figure out why it's doing this I'll let you know!!
-----------Original Post----------------
I recently learned how to create a widget where all my favorite blog buttons can scroll through a smaller space on my sidebar therefore making it look less cluttered!
They scroll like this:
Here's a how YOU can make your blog buttons SCROLL too!!
-----------Original Post----------------
I recently learned how to create a widget where all my favorite blog buttons can scroll through a smaller space on my sidebar therefore making it look less cluttered!
They scroll like this:
Here's a how YOU can make your blog buttons SCROLL too!!
1. Go into your layout page and click on Add a New Gadget
2. Choose HTML/Javascript
3. Add the following code in the text box:
<center><div class="textwidget"><marquee direction="up" width="200" onmouseover="this.stop()" scrollamount="5" onmouseout="this.start()" height="400" align="center"> THIS IS WHERE YOU ADD THE HTML CODES FOR YOUR FAVORITE BUTTONS! (You can add as many as you like!) </marquee></div>
The colors in red can be adjusted to fit the space on your sidebars.
The number 5 in yellow adjusts the speed of how quickly the buttons will scroll! The higher the number the faster they will GO!
4. Click save and Viola!!
Enjoy your scrolling buttons and a lot less clutter on your blog!
The number 5 in yellow adjusts the speed of how quickly the buttons will scroll! The higher the number the faster they will GO!
4. Click save and Viola!!
Enjoy your scrolling buttons and a lot less clutter on your blog!
Sunday, April 5, 2009
JDC goes Springy!!

As I mentioned last week I've been working on a new look for this site!! It's Springy and I am happy with the end result!! I really like the cute little caterpillar!! Isn't he cute!! I have to give a shout out to Andrea! She's the one that create this amazing kit called Think Spring!! As soon as I saw it I knew I'd have to play with it!!
I did however create the blue stripped background and the pink bird on my own! Maybe one day I'll be as good of a graphic designer as Andrea!! (I highly doubt it, but a girl can dream right?)
Sunday, March 29, 2009
New Blog Button

I have a new blog button for this site!! If I have worked on your blog and you would like to change out the old button then please feel free to grab the code!! If you just want to put my button on your blog, even if I haven't worked on your blog, by all means GO AHEAD!!
This new button is s glimpse of what I've been working on for this site! Stay tuned!! It's cute and springy and it's a completely new way to code the template so I am excited!!
Tuesday, March 10, 2009
Blog Makeover Giveaway!
Wanna win a FREE blog makeover? If so head over to my personal blog, Following the Footsteps, for a Free Blog Makeover Giveaway!! It's Part of SITS Spring Fling!!

Contest ends March 10th at Midnight!
Subscribe to:
Posts (Atom)


